Tuesday, November 5, 2013

3D Cardboard Stars

3D cardboard stars

Okay so I haven't made these since Christmas 2012 so I dont have my own tutorial made BUT I used this ONE and its FANTASTIC. 

ENJOY!!

Please note below is the clipart that I used as a template. You can print it to whatever size you want. Have fun!


Essential Oil Balm COMING SOON

Essential Oil Balm COMING SOON

Vinyl Tile Tutorial COMING SOON


Vinyl Tile Tutorial COMING SOON- they are in the mail now :)


Growth Chart Ruler

Growth Chart Ruler
So this one was inspired here.
Since there was no tutorial you all are subject to my lessons learned :) and my awesome photo tutorial.

Supplies:
1 6ft board 1x8in
sand paper
paint or stain
ball point pen
words and letters template
sharpie

These are REALLY nice boards so there isn't a ton of sanding to do BUT you do want to make sure the corners are not sharp.
Paint your board. Below you will see one painted and one with a white wash stain that I later customized by ragging watered down black acrylic paint. Let you boards dry completely before moving on. 
 Since we has a special board prep night and all of your boards are dry, this is where may of you will be joining me :) 

Here is where you need to decide what you want your ruler to look like. The ones I made are made to be hung on a wall to the appropriate hight. SO if you want to do that you want to decide how high you want them to hang. a foot off the ground? Then start your board at 1ft... a foot and a half, start your board at 1.5 foot. Got it? :) 
If you want yours to sit on the floor you need to decide that NOW. You will start your board at ZERO. Note if you decide to do your board this way you will either not be able to have a saying at the top OR you will need to stop at 5 ft... Your choice. 

Okay all decided??? Measure your board and with a PENCIL like one you can erase :)  mark your board. I found it easiest at this point to make my "tick" marks first. Using a T square or ruler draw on your ticks. I made mine 2 inches long for each inch tick and 4 inches for each foot tick.

Take your number template and fold in half in the middle of each number (see below) Line up where you want your number using the fold. Carefully while holding in place, open paper. 

 Okay paper opened. 
 Take a ball point pen and trace the outside of your number. When you remove your paper there will be a light indentation. Repeat for each number marking each foot. Also repeat this process if you are doing a saying at the top. 

After your ticks are all done in pencil and your saying and numbers have all been traced, whip out your sharpie. I tried the fancy expensive PRO Sharpie and found that the dollar tree cheap ones worked BETTER. I know, WIN for the Frugal. I found that using your t-square or ruler and drawing a thin line for my ticks worked great. If I wanted them a little thicker (I did) I was able to free hand it a little thicker. Using your indentations from tracing, Sharpie on your numbers. Sometimes in different light it is easier to see it. I stood mine up in the hall way with only a small lamp on and it helped me see the indentations better. Less light easier to see, very strange. 

That is really all there is to it. Please feel free to message me with questions. This one is easier to understand once you are actually doing it. 

A Merry "Kiss"mas Candy Jar


A Merry "Kiss"mas Candy Jar


1 (one) 4″ Terra Cotta Pot
 1 (one) 4″ Terra Cotta Saucer
1 (one) Bubble Bowl
1 (one) Wooden knob
1 (one) Tube Adhesive
Can spray paint

Original inspiration found HERE

Spray paint Saucer, pot and knob. It took me two coats and I took the time to spray the inside of the Saucer as well. 

 Once DRY use your adhesive to glue the pot and the bowl. Make sure you place glue on the bowl and the pot as seen here. Let dry a little before pushing together.  

 Push together then leave alone to dry. 
Again after both the knob and Saucer are DRY glue together using the same method described above. Look from the side to see if the knob is centered, turn saucer, check and repeat. 

MOVE ON TO another project and come back. After everything has dried use a little rubber cement on the inside lip of the saucer to add a grip to the lid. Let dry. It will still be sticky but not wet when dry, that is good :) Add your wired ribbon around pot and tie into a neat bow. 

Finish the ends of your ribbon and your DONE!
Love the paint, Black but NOT black :) 
Change the ribbon and candy out throughout your year for a year round decoration. Cant you see this with a pink ribbon and filled with conversation hearts? 


Simple Christmas Nativity


Simple Christmas Nativity 

***This was originally found here

Supplies needed:
Ball knob 1 1/4"
Rectangle 2 3/8" x 1 1/2" x 3/16"
Furniture button 1/2"
1" x 5" wood block
1" x 4" wood block
Paint colors of choice
Glue
Twine


 paint your blocks and rectangle. Leave the "heads" alone.
 Lesson learned, glue Jesus head on your small rectangle first give it a small chance to dry before you need it again. A little glue goes a long way and it works best if you put a small drop on each piece you want to glue allow to become tacky then glue. 
 Glue the two large rectangles together. See a little on each, let dry a little then glue.
 Now for some heads :)
 Now add your rectangle with Jesus.
 Add twine and your done!!!


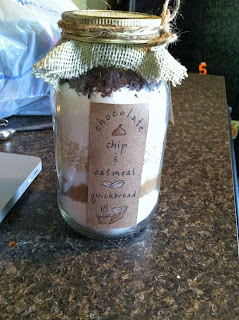
Chocolate Chip and Oatmeal Quick Bread in a Jar

Chocolate Chip and Oatmeal Quick Bread in a Jar


Supplies needed:

1 cup all purpose flour
2 tsp baking powder
1 tsp baking soda
—————————–
1/2 cup brown sugar
1/2 tsp cinnamon
—————————–
1/2 cup granulated sugar
1/2 tsp salt
—————————–
1 cup rolled oats
—————————–
1 cup all purpose flour
—————————–
1/2 cup miniature chocolate chips
—————————–
1/2 cup chopped walnuts

***These are listed in the order you will put them in the jar


She has better photos :)

I used a small funnel to help me get everything neatly in the jar.

Using the end of a large spoon or kitchen utensil gently but firmly pack down ingredients as you add them.   
The photo below is after only the last 1/3 of the four had been added. I panicked a little BUT rest assured you CAN get it all in. Pack it with your kitchen tool. 

When you put the last flour in it is helpful to have a spatula around to clean the 
glass edges and to keep it neat. Continue to add the chocolate chips and the walnuts. You CAN fit it all I promise! 

K this looks funny but let me tell you these ingredients couldn't get any tighter. I used a 1/2 cup measuring cup that fit just inside the jar and a small paint can to pack it all in. 
Yes these walnuts will fit. I will make them fit... Back to the measuring cup and paint can. 
See told you it would all fit :) Place the jar seal on the top. Cut your burlap to a square round that will over lap the edges.   
Place burlap over the seal and twist jar ring on. 
Color you labels for a fun touch. 
Cut out and hole punch
Take a glue stick and glue label to jar. Its okay to go heavy on the glue stick ;)
Back too.
Thread twin through label and wrap around the jar ring TWICE then bow, 
DONE!!!